The demand: our kitchen (well, the kitchen of the house we are renting in Pantai Acheh) could use an extra table, to house some of the electrical appliances (oven, electric kettle, etc.) and also the clutter of things that was occupying more than half the space atop the dining table. My wife had always wanted the dining table to be relatively free of stuffs, so it can be used for all sorts of things during non-meal time, such as tutoring her pupils (for free; she doesn't give tuition, in line with the education department's current policy), doing her homework, etc.
The supply: a couple of ex-pat former colleagues of my wife had left for us some polished timbers (Andy was into woodcraft) that they couldn't bring home with them to their country, and I had reckoned that these should be just enough to make a medium-sized table (the legs will be a bit short; but with casters added, it should be just about the right height).
The worker: I, procrastinator.
***
One fine day, with no work at hand, I decided to give it a go. Finally.
(Actually, a couple of week before that, I had been raring to go at it, but at that time I found - to my horror - that my miter-saw - a manual one - had broken. Argh!!!)
First of all, I prepared the legs:

The table requires four legs (just in case you have never counted the legs of your tables, or throughout your life, all your tables had been the avant-garde types with weird-shape funny-number legs). Without the miter saw, it was quite a challenge cutting them square (right-angled, I mean). At least, they can stand on their own, so it wasn't so bad:

Then, the short horizontal "thingy" (I'm not a real carpenter, I don't know what they are called):

And the long horizontal "thingy" (you will understand what these "thingies" are for later):

The short "thingies" are for holding the legs together. This is for one side of the table:

Notice from the above photo that I was using a third leg to help ensure the squareness of the assembly.
Then for the other side of the table (I used the first frame to help square out the second):

I don't pound nails. I find that erratic and somewhat "irrecoverable" (it's far more easy to remove a screw if you made a mistake). I drill, and I screw. No pun intended. :-)
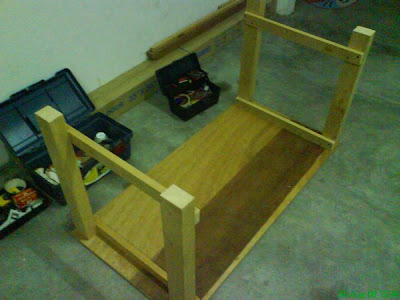
The next picture is not part of the assembly process. I was just putting the legs on the table top (upside down) to get a picture of how it will end up:

Now, the long horizontal "thingies":

And then put on the table top:

I did not have enough polished timber to make another two "long horizontal thingies", so I used unpolished ones I bought at a local hardware store. These are for providing additional support to the table top, which, althogh quite thick and strong, is nonetheless just plywood:

Add a caster (don't ever call it a wheel; it is not a wheel) to each leg:

And voilà! Almost done:

The last thing was to cut the corners (so it will not poke a child's eye or the vital part of a grown man with the right height) and to give it a rough polish (we decided not to paint it; maybe we will coat it with shellac later):

It looks real snug in that corner. Plus, there's a wall socket nearby for the intended electrical appliances:

There is an upgrade coming up - we want to make an additional rack out of those two horizontal "beams":

But that is for another day. Right now, we are just happy (my wife especially) that we finally have an additional table for free up the dining table. :-)
***
I suspect that one of my friends (you know who you are) is going to think of this saying when he first sees the title to this post: "A war to end all wars".
Don't say you didn't. ;-p
For me, I know of a death that ended all deaths... I shall forever love that man.

No comments:
Post a Comment